> ## Documentation Index
> Fetch the complete documentation index at: https://docs.noqa.ai/llms.txt
> Use this file to discover all available pages before exploring further.
# Writing Good Test Cases
> How to write test cases that the agent can execute reliably.
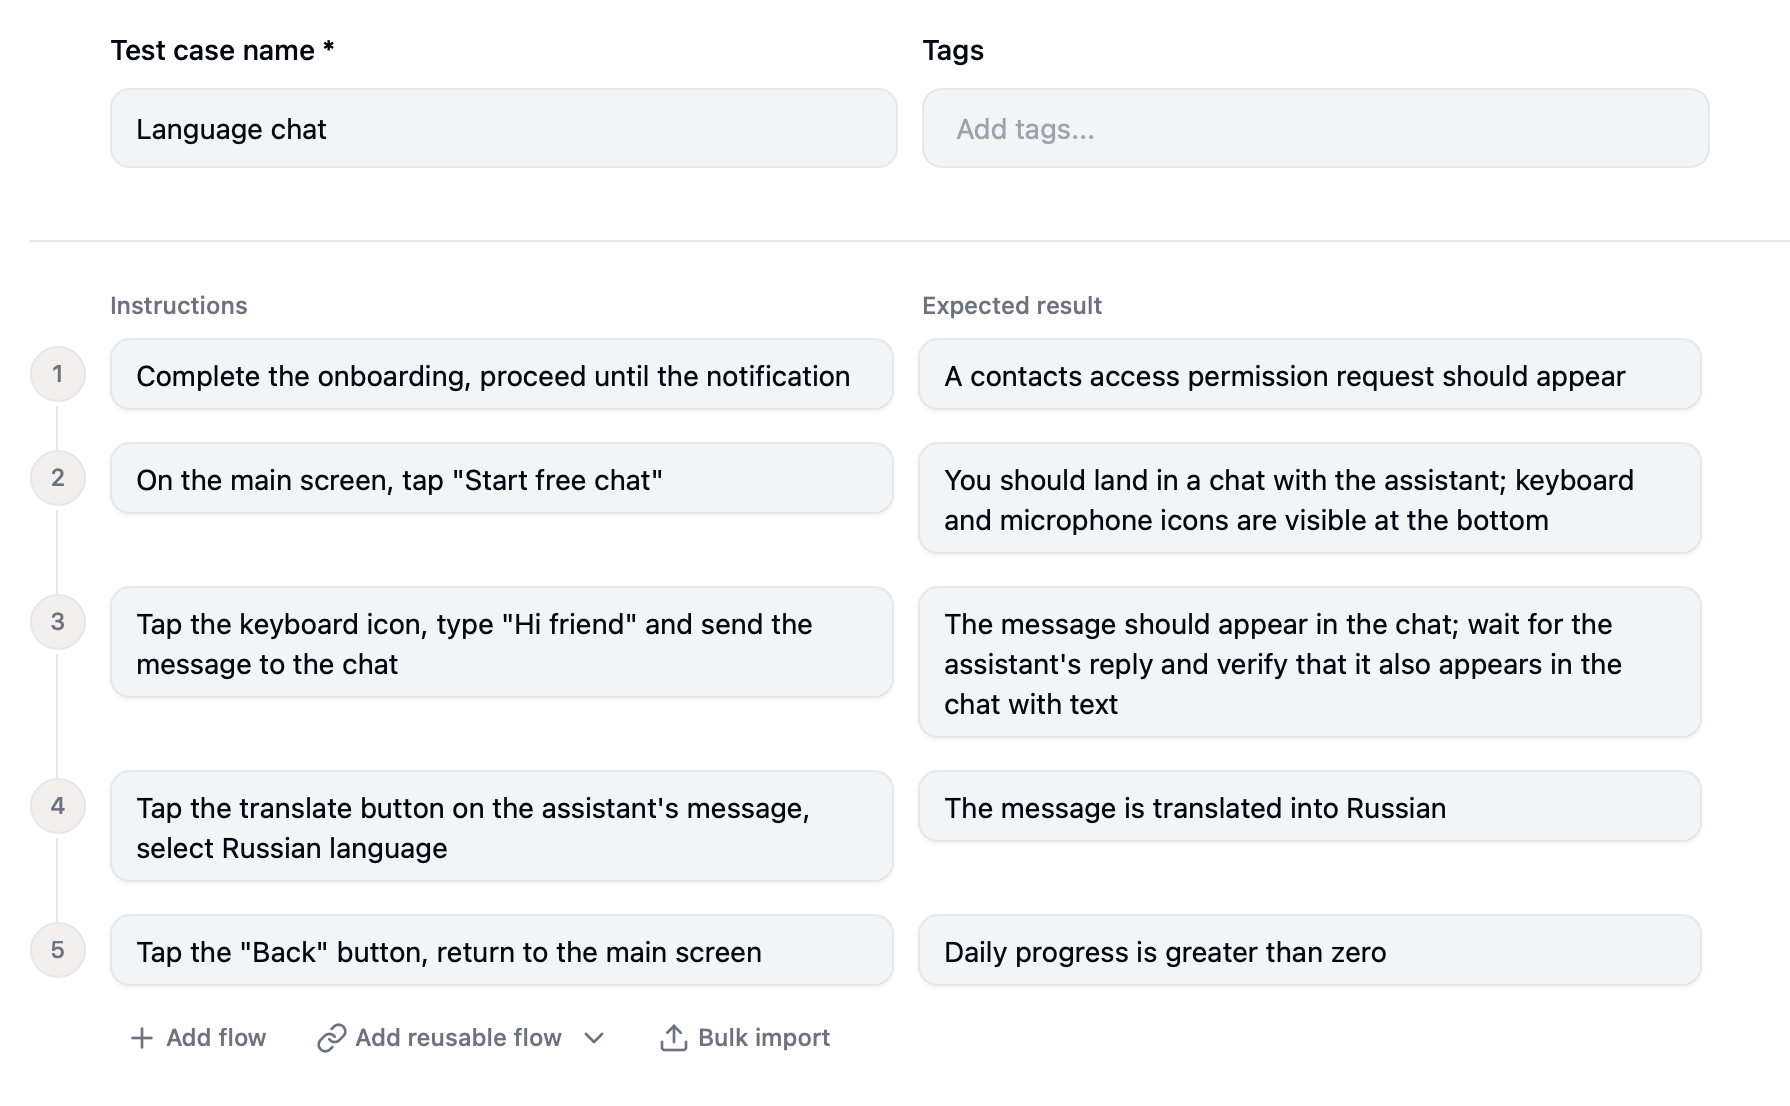
## Structure
A test case consists of:
* **Title** — a short human-readable name for the test.
* **Flows** — one or more steps the agent will execute. Each flow has **instructions** (what to do) and an optional **expected result** (what to verify).
 ## App context
App context is a shared description of your app that gets added to every test case automatically. You write it once — the agent uses it in every run. It is configured in **Settings**.
Use it to describe things the agent needs to understand your app:
* **General rules** — instructions that should apply to every test. Only include things that are genuinely non-obvious to the agent. For example: "Always grant any permission prompts that appear" — the agent will follow this regardless of where in the app the prompt shows up.
* **Credentials** — for example, test account login and password.
* **Screen and feature names** — if your test cases reference specific screen or feature names, define them here once.
* **Core functionality** — a brief description of what the app does and how its main features work.
* **Game rules** — if you're testing a game, describe the rules, win/lose conditions, and key UI elements once here instead of repeating it in every test case.
Login: [test@example.com](mailto:test@example.com) / Test1234.
Home screen — the first screen after login. Contains a search bar at the top and a list of recent items below.
Profile screen — accessible via the bottom tab bar. Shows the user's name, avatar, and account settings.
Sign in and go to the Profile screen.
***
On the Home screen, search for "shoes".
## Instructions
Instructions tell the agent what to do. Writing good instructions is an iterative process — write, run the test, watch what the agent does, and adjust if needed.
### Don't describe every action
The agent understands goals — you don't need to list every tap and swipe.
* Tap on button Next on the screen with text "Welcome to App".
* Tap on button Next on the screen with text "Discover new features".
* Tap on button Get Started on the screen with text "Ready to dive in?".
Complete the onboarding flow until you reach the paywall.
### But be more specific when the agent goes off track
That said, if the agent does something unexpected, the instructions are probably too vague. Add more detail — name the exact element, specify which screen, or break the step into smaller ones.
Change the name to "John Test".
1. Tap the hamburger menu icon in the top-left corner.
2. On the Profile screen, tap the Edit button in the top-right corner.
3. Change the display name to "John Test" and tap Save.
### Write step by step
Structure instructions as a sequence of logical steps — one goal per step.
Sign in with [test@example.com](mailto:test@example.com) and password Test1234, then go to profile, change the display name to "John Test" and save, then go back to home and open settings.
1. Sign in with [test@example.com](mailto:test@example.com) / Test1234.
2. Navigate to the profile screen.
3. Change the display name to "John Test" and save.
4. Go to Settings.
### Anchor gestures to elements
The agent navigates by what it sees on screen, so always tie gestures to specific elements:
**Tap** — name the element to tap: button label, icon, or its position on screen.
Tap the button.
Tap the "Sign in" button at the bottom of the screen.
**Swipe / scroll** — name the element to swipe on, or specify from which element to which.
Swipe left.
Swipe down.
Swipe left on the "Inbox" card to reveal the delete button.
Swipe from the battery icon at the top-right corner down.
**Drag** — specify both the element to drag from and the element to drop onto.
Drag the item up.
Drag the "Work" task and drop it above the "Personal" task.
**Pinch** — zoom a surface or resize a selected object; name it and the direction (in to zoom in / enlarge, out to zoom out / shrink).
Zoom in.
Make it bigger.
Pinch to zoom in on the map to reveal street names.
Pinch to enlarge the selected "Sale" text sticker.
## Expected result
Each flow can have one expected result — what the agent should verify after completing the instructions. If not set, the agent only checks that it completed the flow without errors.
Describe what should be visible on screen: a specific message, button, screen, or state. The more concrete, the better.
It works.
The confirmation screen shows "Order placed successfully" and an order number.
The login fails.
The error message "Invalid credentials" is visible on screen.
## Reusable flows
If the same steps appear in multiple test cases — for example, a login flow — you can create a reusable flow and reference it instead of duplicating the instructions. When the reusable flow changes, all test cases using it are updated automatically.
Use reusable flows for: login, onboarding, account setup, or any prerequisite state that many tests depend on.
## Tags
Tags let you organize test cases in the dashboard. You can filter by tag and run only the matching cases — useful for running a specific feature, platform, or test suite.
Examples: `auth`, `payments`, `ios-only`, `smoke`, `regression`, `cloud`.
## App context
App context is a shared description of your app that gets added to every test case automatically. You write it once — the agent uses it in every run. It is configured in **Settings**.
Use it to describe things the agent needs to understand your app:
* **General rules** — instructions that should apply to every test. Only include things that are genuinely non-obvious to the agent. For example: "Always grant any permission prompts that appear" — the agent will follow this regardless of where in the app the prompt shows up.
* **Credentials** — for example, test account login and password.
* **Screen and feature names** — if your test cases reference specific screen or feature names, define them here once.
* **Core functionality** — a brief description of what the app does and how its main features work.
* **Game rules** — if you're testing a game, describe the rules, win/lose conditions, and key UI elements once here instead of repeating it in every test case.
Login: [test@example.com](mailto:test@example.com) / Test1234.
Home screen — the first screen after login. Contains a search bar at the top and a list of recent items below.
Profile screen — accessible via the bottom tab bar. Shows the user's name, avatar, and account settings.
Sign in and go to the Profile screen.
***
On the Home screen, search for "shoes".
## Instructions
Instructions tell the agent what to do. Writing good instructions is an iterative process — write, run the test, watch what the agent does, and adjust if needed.
### Don't describe every action
The agent understands goals — you don't need to list every tap and swipe.
* Tap on button Next on the screen with text "Welcome to App".
* Tap on button Next on the screen with text "Discover new features".
* Tap on button Get Started on the screen with text "Ready to dive in?".
Complete the onboarding flow until you reach the paywall.
### But be more specific when the agent goes off track
That said, if the agent does something unexpected, the instructions are probably too vague. Add more detail — name the exact element, specify which screen, or break the step into smaller ones.
Change the name to "John Test".
1. Tap the hamburger menu icon in the top-left corner.
2. On the Profile screen, tap the Edit button in the top-right corner.
3. Change the display name to "John Test" and tap Save.
### Write step by step
Structure instructions as a sequence of logical steps — one goal per step.
Sign in with [test@example.com](mailto:test@example.com) and password Test1234, then go to profile, change the display name to "John Test" and save, then go back to home and open settings.
1. Sign in with [test@example.com](mailto:test@example.com) / Test1234.
2. Navigate to the profile screen.
3. Change the display name to "John Test" and save.
4. Go to Settings.
### Anchor gestures to elements
The agent navigates by what it sees on screen, so always tie gestures to specific elements:
**Tap** — name the element to tap: button label, icon, or its position on screen.
Tap the button.
Tap the "Sign in" button at the bottom of the screen.
**Swipe / scroll** — name the element to swipe on, or specify from which element to which.
Swipe left.
Swipe down.
Swipe left on the "Inbox" card to reveal the delete button.
Swipe from the battery icon at the top-right corner down.
**Drag** — specify both the element to drag from and the element to drop onto.
Drag the item up.
Drag the "Work" task and drop it above the "Personal" task.
**Pinch** — zoom a surface or resize a selected object; name it and the direction (in to zoom in / enlarge, out to zoom out / shrink).
Zoom in.
Make it bigger.
Pinch to zoom in on the map to reveal street names.
Pinch to enlarge the selected "Sale" text sticker.
## Expected result
Each flow can have one expected result — what the agent should verify after completing the instructions. If not set, the agent only checks that it completed the flow without errors.
Describe what should be visible on screen: a specific message, button, screen, or state. The more concrete, the better.
It works.
The confirmation screen shows "Order placed successfully" and an order number.
The login fails.
The error message "Invalid credentials" is visible on screen.
## Reusable flows
If the same steps appear in multiple test cases — for example, a login flow — you can create a reusable flow and reference it instead of duplicating the instructions. When the reusable flow changes, all test cases using it are updated automatically.
Use reusable flows for: login, onboarding, account setup, or any prerequisite state that many tests depend on.
## Tags
Tags let you organize test cases in the dashboard. You can filter by tag and run only the matching cases — useful for running a specific feature, platform, or test suite.
Examples: `auth`, `payments`, `ios-only`, `smoke`, `regression`, `cloud`.